Blog

  • How to Add Countdown Timer in WordPress (Valentine Mood 2025) with Brandy

    As Valentine’s Day is going ahead, the excitement in the air becomes palpable. As a WooCommerce business, elevate the anticipation and create an unforgettable ambiance by incorporating a countdown timer into your romantic festivities. 

    An effective way to spread your efforts is to run an offer campaign this holiday or launch a new special product. But how do you inform your visitors about this program? Obviously, a website countdown timer packs a punch when it comes to prompting visitors to take action, it not only builds excitement but also serves as a whimsical reminder of the special moments leading up to your celebration.

    Imagine the delight of watching the seconds tick away, each moment bringing you closer to a cherished special event, a surprise gift reveal, or a flash sale program. In this blog post, we’ll explore creative ways for your Valentine’s vibe to add a countdown timer in WordPress, from digital displays to charming DIY projects, ensuring that your celebration is infused with love, joy, and a touch of playful anticipation. 

    Get ready to transform your Valentine’s Day into a joyous countdown that enhances the magic of this beloved holiday!

    Why Should You Add Countdown Timer in WordPress Site?

    As we know, a countdown timer in WordPress is also a banner, a visual reminder on your WooCommerce store to make sure customers know that a special day is rapidly approaching, building anticipation and heightening emotions.

    Well, imagine setting up a beautifully designed countdown clock in your living room, adorned with romantic decorations — hearts, flowers, and twinkling lights. Each tick of the clock intensifies the excitement, creating an engaging focal point that draws attention and sparks conversation. This simple yet effective tool transforms a regular celebration into an experience that feels more significant and meaningful. 

    Similar to your WordPress site, a countdown banner for “upcoming new products”, “occasion of offer discounts”, “upcoming grand events or conferences”, or many other events can enhance the atmosphere, produce the FOMO effect, and scale up conversion and sales for your WooCommerce business. 

    How to Add Countdown Timer in WordPress with Valentine Mood?

    Whether you’re a professional or a fresher in web design, this article will show you how to add a countdown timer in WordPress through simple steps with Brandy, ensuring a touch of romance in every visitor’s experience.

    Install and Activate Brandy

    Brandy Theme free download

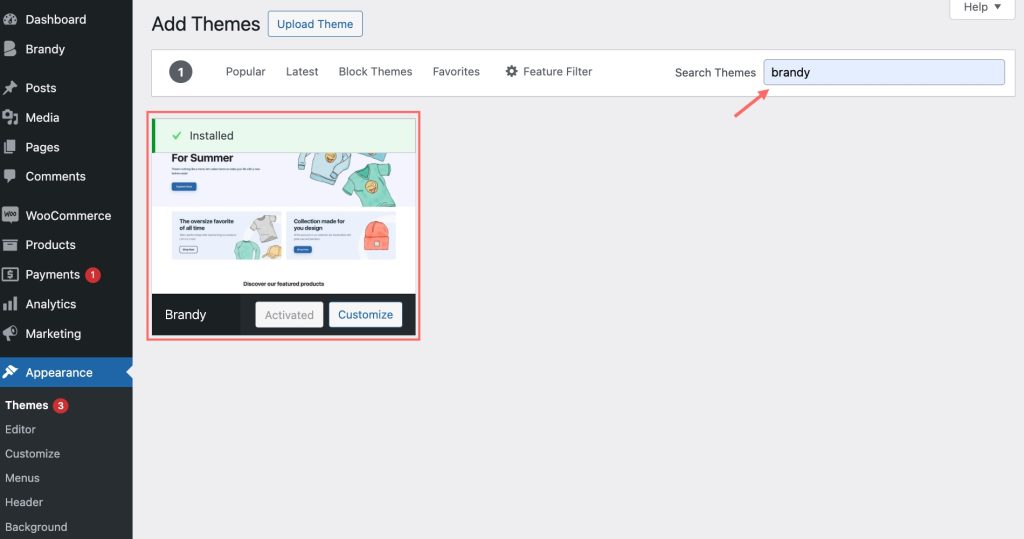
    First up, on your WordPress dashboard, activate the Brandy Theme – a potential theme that allows you to design your website in your desired style with many pre-built templates and full of customization functions. 

    Activate Brandy Theme

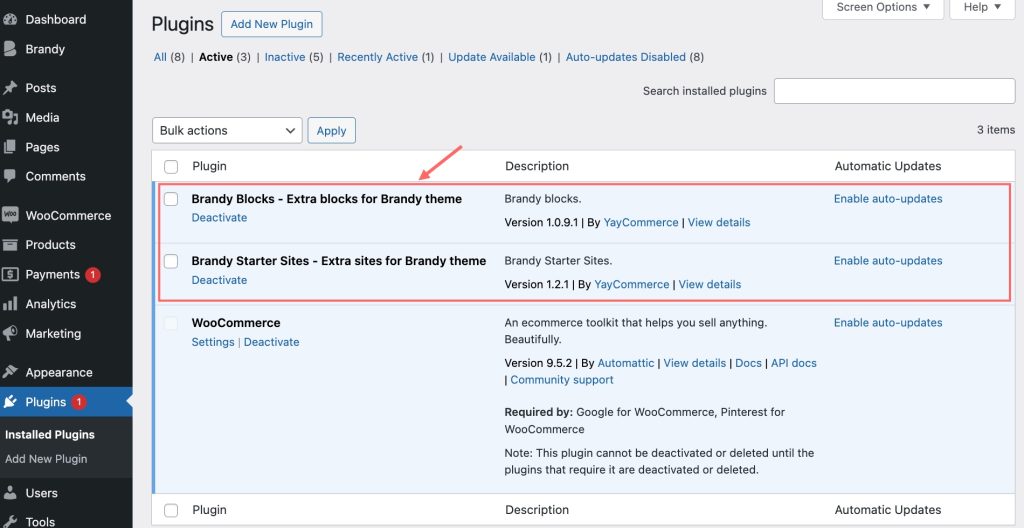
    In the attached Brandy Theme, the development team of Brandy also provides Brandy Starter Sites and Brandy Blocks, which help users create a wonderful website and customize all the elements in the website with simple clicks. Therefore, we have to install and activate both of them.

    Install and Activate Brandy plugin

    Now, let’s see how to integrate a countdown timer into your WordPress site.

    Create Your Countdown Timer for Valentine Ahead

    With the support of Brandy Theme and Brandy Starter Sites, we’ll turn our tasteless website into an amazing WooCommerce store with Valentine’s vibe.

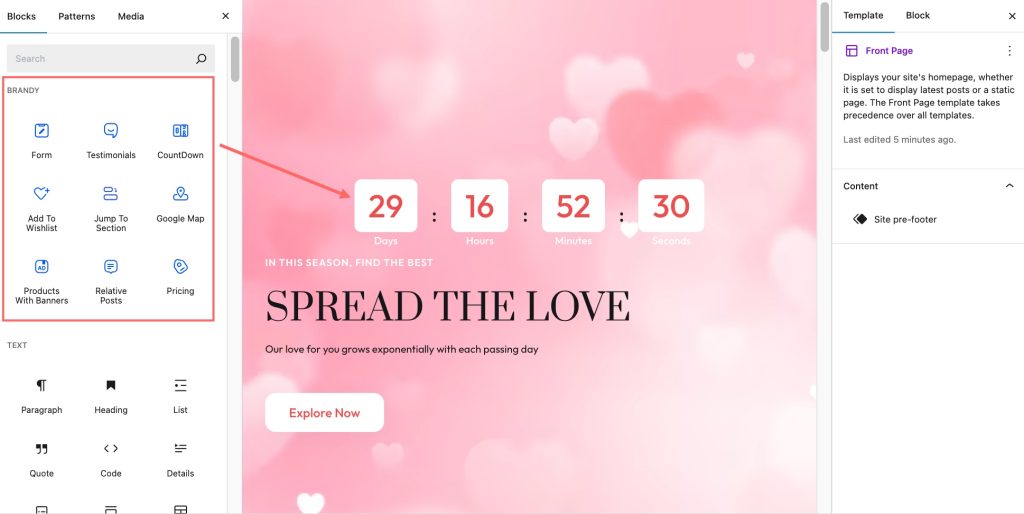
    Brandy Blocks will be the tool that helps us create and customize our countdown timer’s appearance. This plugin works well with all page builders, so you can add countdown blocks anywhere you want, including new or available pages, posts, and widgets.

    Add Countdown timer in WordPress

    For example, we want to add countdown timer in WordPress homepage. So, we will find the “Countdown” block and drag it to any position on our homepage. In the panel of Site edit, you can see all the blocks of Brandy in the first section or search specific blocks in the search box.

    Find countdown block of Brandy

    Now, you have got the default countdown timer on your screen, it’s time to adjust it to your style. 

    First, we should set the countdown due date, and adjust the direction of overall and each item in the Countdown block. 

    Modify the appearance of CountDown timer

    Next, customize how and where your countdown timer will appear on your website. Define the time units of the countdown timer. 

    Adjust time unit of countdown timer

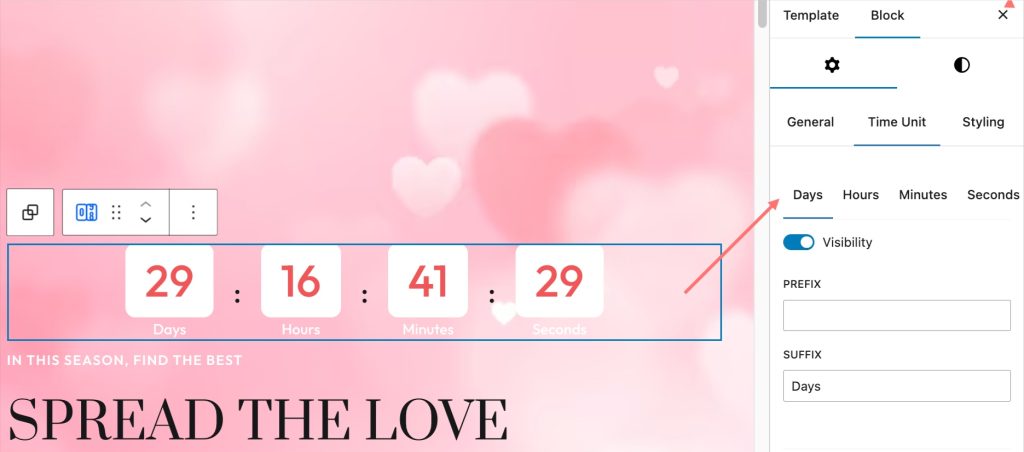
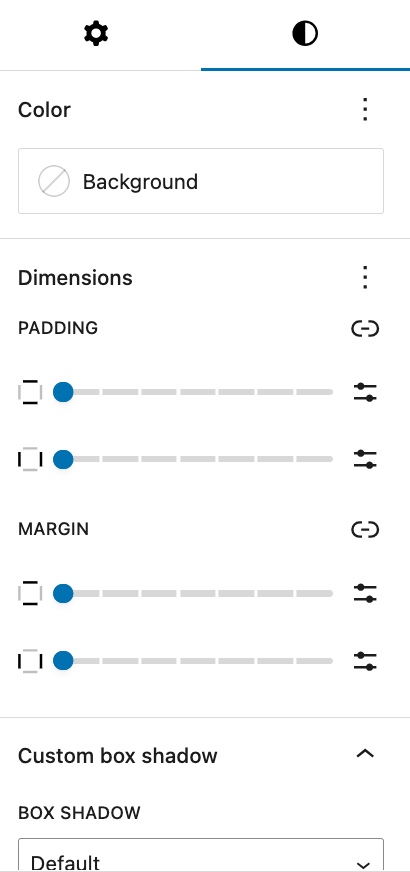
    Choose colors and fonts that match your Valentine’s Day theme—think soft pinks, reds, or even romantic pastels. You can choose 2 types of background color: one is the color for each time box, and one is the color for the general countdown block. 

    Customize the style of suffix in Countdown timer

    Also, you can alter and adjust the content spacing, padding, bottom margin, etc. You can even stylize the timer segment-wise, meaning you can select prefix, main, and suffix content individually to style. I have shown the styling of the “Suffix” segment, including color, typography, and size. The other segment can be stylized in a similar fashion, too.

    Customize the Display Settings

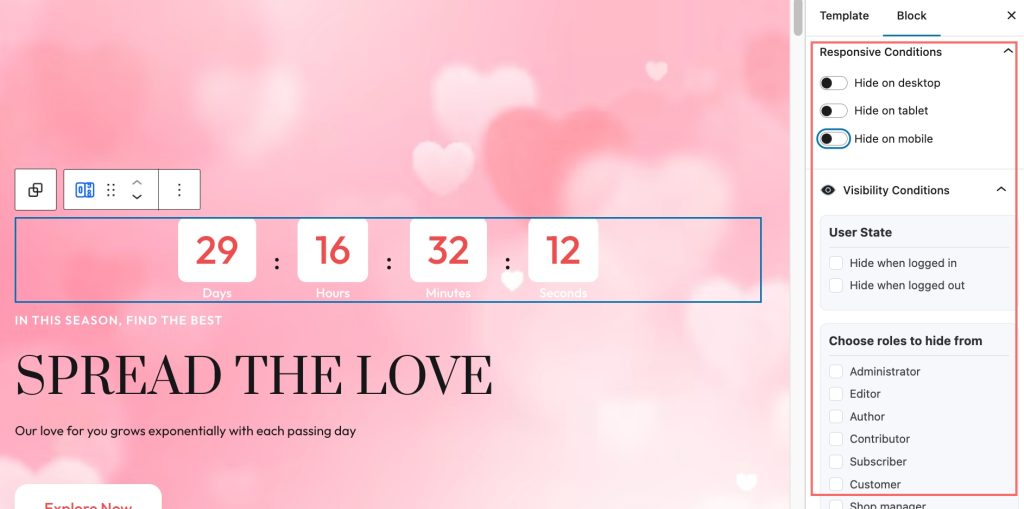
    In the advanced setting, Brandy allows users to set conditions to hide the Countdown timer block in specific devices or according to user state, user roles, browsers, and specific days in a week.


    Apart from that, you can also design one countdown timer and apply this style to the others if your WordPress site has many countdown timers. You just need to click the “Apply globally” button on the Advanced tab.  

    Apply globally style with advanced setting

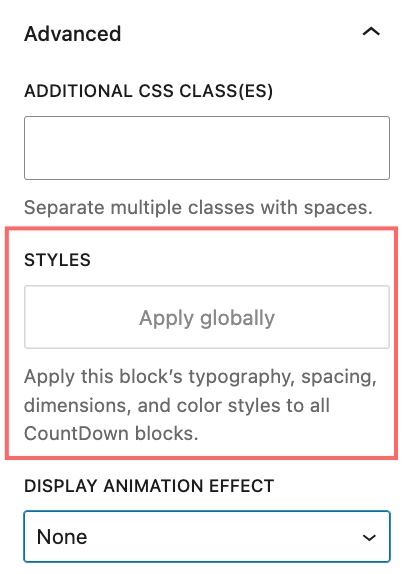
    Another feature in the Advanced tab, you can choose the “animation effect” for the countdown timer when it appears on the WooCommerce website.

    Once you are done with all the tweaks and adjustments, you are all set to preview the countdown timer on your site live. Let’s see full of the Valentine’s vibe on our WordPress website.

    Valentine website with Countdown timer

    Thus, by following these simple steps, you can effectively add a countdown timer to your WordPress site, helping to create an alluring and romantic environment for your visitors as Valentine’s Day approaches.

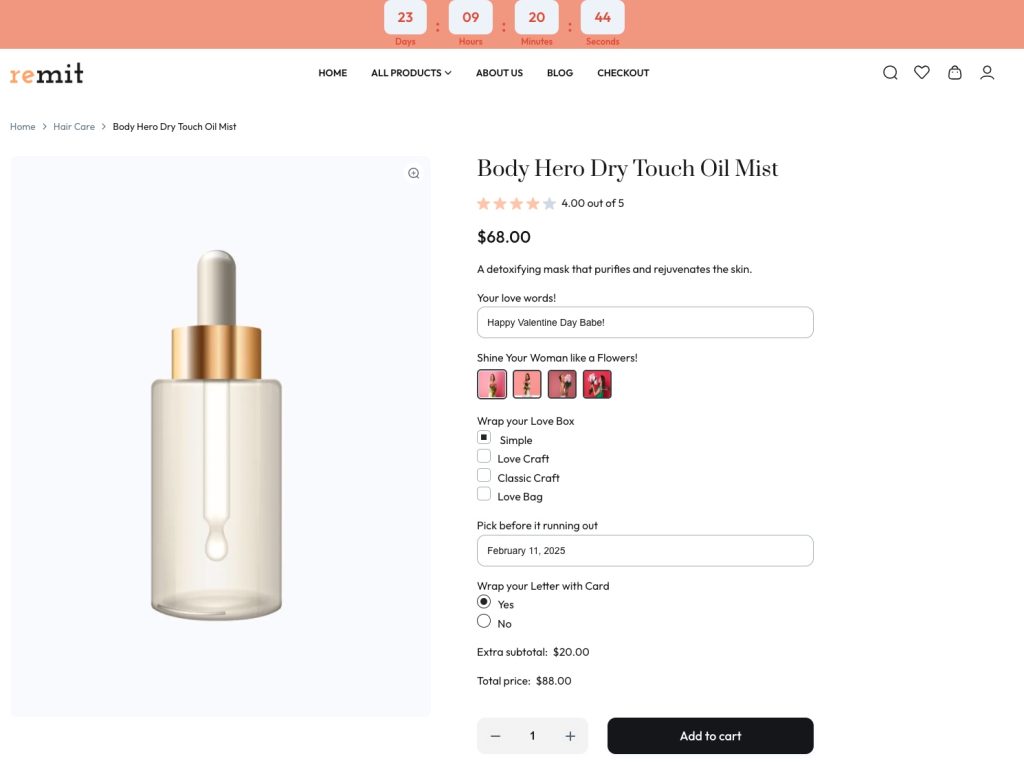
    Best Practice: Make Your Girlfriend Happy

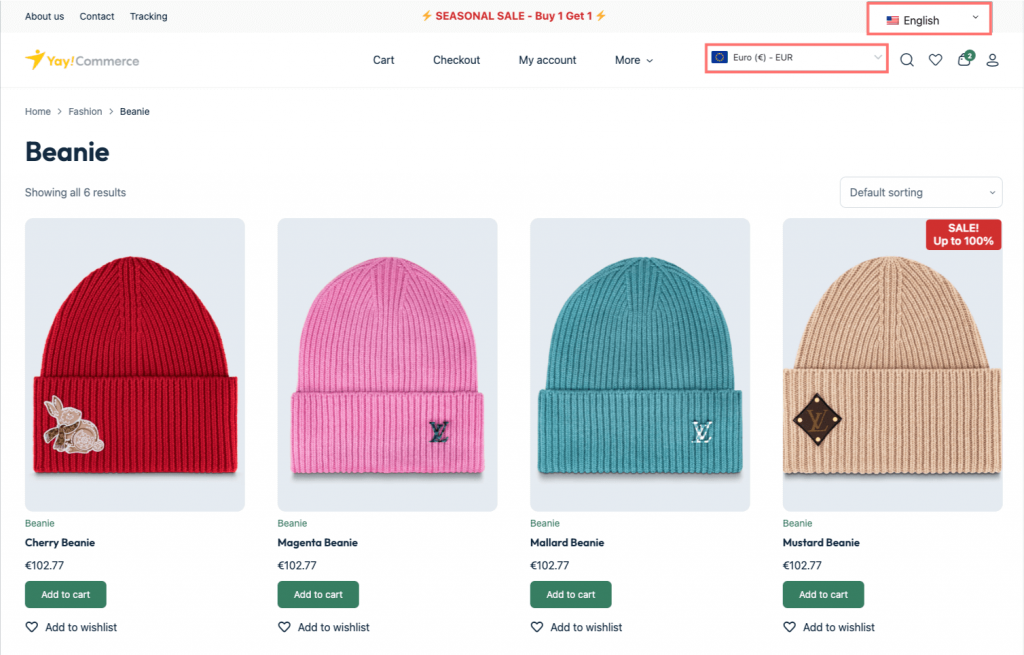
    In preparation for Valentine’s Day, we have created some options with YayExtra. Our special offer will finish before Valentine, so that, men should buy it as a gift for their lover. We also add countdown timer in WordPress header of our product page, we aim to create FOMO psychological for our customers when purchasing. Let’s see how it works!

    Website sample for Valentine with YayExtra and countdown timer

    Conclusion: Enhancing Your Valentine’s Day Experience

    So, with the support of Brandy, your preparation for Valentine will take no effort. Brandy is an easy-peasy and powerful tool to help users enhance their WooCommerce store design,  whether you’re a small business promoting Valentine’s Day specials or an individual sharing your love story,

    By add countdown timer in WordPress site, you’re not just announcing the date but building excitement and anticipation for the celebration ahead. This simple yet impactful addition can transform your website into a vibrant hub of romance, reminding visitors of the love that’s just around the corner. 

    In conclusion, implementing a countdown timer on your WordPress site not only enhances the aesthetic appeal but also creates an engaging experience for your audience. So, take a moment to embrace this creative tool and watch as it elevates your Valentine’s Day preparations. Celebrate love, foster connections, and make this Valentine’s Day unforgettable—because every second counts when you’re creating cherished memories with someone special.


  • How to Add Trust Badges to the WooCommerce Checkout Page

    Do you want to add WooCommerce trust badges to the checkout page? If you are looking for a simple method, keep reading this article.

    Since CoD (Cash on Delivery) is not an ideal option for most WooCommerce stores, they integrate any payment gateway like PayPal or Stripe to collect payments for orders. However, some people are still hesitant to use their credit cards on a website when this is convenient.

    However, showing a trust badge on the checkout page will make people feel more confident. This blog post will teach you how to do this. However, WooCommerce doesn’t come with this feature by default.

    We need to add the trust badge manually. Here, we will show you the best method to add WooCommerce trust badges on the checkout page.

    But first, let’s see why you should add trust badges to the WooCommerce checkout page.

    Why You Should Add Trust Badges to WooCommerce Checkout Page

    Adding trust badges to your WooCommerce checkout page can significantly enhance the perceived reliability of your online store.

    WooCommerce trust badges

    Trust badges are small icons or seals that indicate security, authenticity, or customer approval, which can reassure visitors that their transactions are safe and that your brand is credible. Firstly, trust badges are a visual cue that your site is secure.

    With the rise of cyber threats, such as data breaches and identity theft, customers are increasingly cautious about where they enter personal information.

    Badges like SSL certificates, Norton Secured, or McAfee Secure signal to customers that their data is encrypted and protected, potentially reducing cart abandonment due to security concerns.

    Secondly, these badges can boost conversion rates. When shoppers see that third-party entities have verified a site for quality or customer satisfaction, their confidence in purchasing increases.

    For instance, displaying badges from well-known review platforms like Trustpilot or Google Customer Reviews can leverage social proof and show new customers that others have had positive experiences with your store.

    Now you know why you should add trust badges to WooCommerce checkout. The next section will show you the popular method you can follow.

    Best Practices to Use Trust Badges in WooCommerce

    When you’re adding trust badges to your WooCommerce store, keep these things in mind:

    • Select Relevant Trust Badges: Choose trust badges that resonate with your audience’s concerns, whether security, payment options, or product guarantees. For security, consider badges like Norton Secured or McAfee Secure, while badges from Visa or PayPal might be suitable for payment.
    • Placement Matters: Position trust badges where they are most impactful. The checkout page is crucial, but consider placing them on product pages, especially below the “Add to Cart” button or within the product description. They should be visible but not distracting.
    • Use Customization Wisely: Using a plugin like Merchant or Flux Checkout for WooCommerce, use customization features to match the badges with your site’s aesthetic. This can make your site appear more professional and cohesive.
    • Ensure Authenticity: Only display trust badges you’ve legitimately earned or can use. Misusing badges can lead to distrust rather than building it. Consider third-party endorsements like those from the Better Business Bureau or industry-specific certs.
    • Educate Your Customers: Use tooltips or pop-ups to explain what each badge means if it’s not immediately clear to your visitors. For example, clicking on a security badge could show details about your SSL certification or data protection policies.

    How to Add Trust Badges to WooCommerce Checkout Page

    Here, we will add a simple PHP snippet to the website to display the trust badge.

    Since we are dealing with coding, we recommend using a site-specific plugin like Code Snippets or making all the modifications on your child theme’s functions.php file.

    For this tutorial, we will use the code snippets plugin. To use it, you need to install and activate the plugin. Then, create a new snippet and paste some code.

    The code you need to use is:

    add_action( 'woocommerce_after_cart_totals', 'yay_display_trust_seal_image_in_cart_page' );
    
    function yay_display_trust_seal_image_in_cart_page() {
    // Get the trust seal image URL.
    $trust_seal_image_url = 'https://res.cloudinary.com/do2y26dyd/image/upload/v1696840366/Trust_Seal_pkd8kn.png';
    
    // Display the trust seal image.
    echo '<img src="' . $trust_seal_image_url . '" alt="Trust seal" width="100%"/>';
    }
    trust badge snippet

    Once you have pasted the code, you can activate it.

    Now, go to your website’s checkout page. You’ll see a badge on the cart page.

    cart badge

    As you can see in this image, the badge will be displayed under the button. If you need to show it above the button, use this code:

    add_action( 'woocommerce_proceed_to_checkout', 'yay_display_trust_seal_image_in_cart_page' );
    
    function yay_display_trust_seal_image_in_cart_page() {
    // Get the trust seal image URL.
    $trust_seal_image_url = 'https://res.cloudinary.com/do2y26dyd/image/upload/v1696840366/Trust_Seal_pkd8kn.png';
    
    // Display the trust seal image.
    echo '<img src="' . $trust_seal_image_url . '" alt="Trust seal" width="100%"/>';
    }

    Now, if you need to display it on the checkout page, use this code:

    add_action( 'woocommerce_review_order_after_payment', 'yay_display_trust_seal_image_on_checkout_page' );
    
    function yay_display_trust_seal_image_on_checkout_page() {
    // Get the trust seal image URL.
    $trust_seal_image_url = 'https://res.cloudinary.com/do2y26dyd/image/upload/v1696840366/Trust_Seal_pkd8kn.png';
    
    // Display the trust seal image.
    echo '<img src="' . $trust_seal_image_url . '" alt="Trust seal" />';
    }

    On the front end, it will look like this:

    badge on checkout page - WooCommerce trust badges

    If you need to change the badge image, you can tweak the URL in the code and replace it with your custom badge URL.

    This is how you can use coding to display trust badges.

    Frequently Asked Questions

    Next, let’s look at some of the popular questions and answers regarding this topic.

    Can I use custom trust badges, or must I use only those from recognized providers?

    Custom badges can highlight unique aspects of your service, such as free returns. However, complement these with well-known security badges from providers like Norton or Trustpilot for maximum trust.

    Where should I place trust badges on my WooCommerce checkout for maximum impact?

    Place them near the payment information fields or right before the “Place Order” button to reassure customers before they commit. For consistent trust messaging, consider adding them in the cart summary or footer.

    Will adding trust badges to my checkout page affect the loading speed of my WooCommerce site?

    It could, especially if the images are large or not optimized. Compress your badge images, consider lazy loading, and ensure external scripts load asynchronously to minimize speed impact. Test your site’s performance after adding the badges to confirm.

    Conclusion

    Adding trust badges to your WooCommerce checkout page is a strategic move to bolster customer confidence and enhance the shopping experience.

    These badges act as silent ambassadors of security and reliability, helping to bridge the trust gap that often exists in online transactions.

    By showcasing that your site is secure, backed by customer reviews, or affiliated with trusted payment methods, you can reduce cart abandonment, increase conversion rates, and ultimately foster a loyal customer base.

    We highly recommend adding a trust badge to your online store.

    Which method would you use?

    Let us know in the comments.

    Check out this page if you want video content instead of written tutorials.

  • 10 Ways to Increase WooCommerce Product Reviews

    Do you want to increase WooCommerce product reviews? If you are looking for a feasible method, keep reading this article. Here are the top 10 ways to increase product reviews on WooCommerce!

    If you need to boost your sales, showing positive customer reviews on the WooCommerce store is a good idea. Some people would be double-minded when it comes to buying stuff online. So to turn the thinker into a customer, you could use the customer reviews.

    WooCommerce comes with a reviewing option by default. However, you need to gather the reviews yourself. Most people don’t add a customer review once they have received the product they ordered.

    In this post, we will show you the best methods for gathering more product reviews for your WooCommerce store.

    But before going further, let’s see why you should increase product reviews on WooCommerce.

    Why You Should Increase the WooCommerce Product Reviews

    One of the primary reasons to focus on accumulating product reviews on WooCommerce is to enhance the credibility of your products.

    When potential buyers see a product backed by numerous reviews, it instills a level of trust, showcasing that others have had positive experiences with your offerings. Moreover, search engines tend to favor websites with active user engagement, including reviews.

    This can lead to improved SEO rankings, making your products more visible to searchers, which is crucial for driving organic traffic to your store. Product reviews can also significantly increase conversion rates.

    Now you know why you should get more product reviews on WooCommerce. In the next section, we will show you how to achieve it.

    Best 10 Methods to Increase Product Reviews on WooCommerce

    product reviews - Increase Product Reviews on WooCommerce

    In a nutshell, the methods we are going to list are:

    • Automate Review Requests
    • Incentivize Reviews
    • Simplify the Review Process
    • Display Reviews Prominently
    • Engage with Reviews
    • Use Social Proof
    • Optimize for Mobile Users
    • Educate Customers
    • Leverage Email Marketing
    • Monitor and Improve

    In the next section, we will show you how each method can help you with the business.

    Without any further ado, let’s get into the listicle.

    1. Automate Review Requests

    automate reviews

    Automating review requests on your WooCommerce store can significantly increase the number of reviews you receive by ensuring that every customer is prompted to share their feedback with minimal effort on your part.

    The first step in this process involves setting up an email automation system. WooCommerce, along with various plugins like Yotpo, Judge.me, or even native email marketing tools like Mailchimp, can trigger emails based on customer actions, such as a completed purchase.

    Once you’ve chosen your tool, configure it to send out a review request email shortly after the customer has received their product.

    Timing here is key; you want to catch customers when their experience with your product is fresh but give them enough time to have used or tried the product. Typically, this could be a few days after the expected delivery date.

    2. Incentivize Reviews

    Incentivizing reviews on your WooCommerce store can be a powerful motivator for customers to share their thoughts about your products. However, it’s crucial to approach this strategy with care to ensure the integrity of the feedback remains intact.

    Start by offering incentives that are appealing but not overly persuasive that they compromise the honesty of reviews. One common and effective method is providing a discount code for future purchases.

    This can be a percentage off their next order or a set amount, but make it clear that the incentive is for leaving an honest review, whether positive or negative. This not only encourages reviews but also incentivizes repeat business.

    Another approach is to enter reviewers into a contest or giveaway. For example, every review submitted could be an entry into a monthly draw for a larger prize. This method can generate excitement around reviewing and doesn’t necessarily tie the incentive to the act of leaving a positive review, allowing for genuine feedback.

    3. Simplify the Review Process

    simplify reviews

    Simplifying the review process on your WooCommerce store is crucial for encouraging more customers to share their feedback.

    The easier it is for customers to leave a review, the more likely they are to do so. Start by streamlining the actual act of reviewing. This can mean reducing the number of steps required to submit a review.

    For example, instead of multiple pages or fields, consider a single page where customers can rate, and then optionally write a comment, all in one go. The user interface is another area where simplification can make a big difference.

    Design your review form to be intuitive, with large, clear buttons for star ratings and straightforward text fields for comments. If possible, implement one-click review options for those who want to give a quick rating without typing out a full review.

    Mobile optimization is vital here as well; ensure that the review form is just as easy to navigate on a smartphone as on a desktop, with large touch targets and minimal scrolling.

    4. Display Reviews Prominently

    display reviews

    Displaying reviews prominently on your WooCommerce store is a strategic move to not only encourage more reviews but also boost sales and build consumer trust.

    Firstly, ensure that reviews are placed in a prominent position on each product page. Ideally, they should appear just below the product description or alongside the product images, where they are one of the first things a visitor sees.

    This placement leverages the power of first impressions, where potential buyers can immediately gauge the product’s reception by others.

    If your theme allows, consider using a slider for reviews or a pop-up that highlights a particularly compelling review when a user spends time on the product page. Make sure the number of reviews is also visible, as it can influence perceptions of product popularity.

    For example, “4.5 stars from 500+ reviews” conveys a different message than “4.5 stars from 5 reviews.” The higher the volume of reviews, the more credible and trustworthy the product appears.

    5. Engage with Reviews

    engage with reviews

    Engaging with reviews on your WooCommerce store is an essential strategy that goes beyond merely collecting feedback; it’s about building relationships, demonstrating customer care, and enhancing your brand’s reputation. Here’s how you can actively engage with reviews:

    • Respond to Reviews: Whether the feedback is positive or negative, make it a point to respond. This shows that you value customer feedback and are committed to service excellence.
    • Personalize Your Responses: Avoid generic responses. Mention the customer by name if possible, or reference specific points from their review. This personal touch can turn a standard review into a meaningful interaction, fostering loyalty.
    • Use Reviews for Improvement: When customers point out areas for improvement, take it as constructive criticism. You might even share updates on how you’ve addressed feedback in subsequent communications, showing that you listen and act on customer input.
    • Ask for More Details: Sometimes, a review might not be detailed enough to understand the full scope of feedback. Politely ask for more information or invite the reviewer to contact you directly for a more personalized follow-up.
    • Highlight Engagements: If you’ve had a particularly insightful exchange with a reviewer, consider highlighting this interaction. You could feature it in your newsletter, on your social media, or even on the product page itself (with permission from the reviewer).

    6. Use Social Proof

    Social proof is a psychological phenomenon where people conform to the actions of others under the assumption that those actions are reflective of the correct behavior.

    One effective way to leverage social proof is by displaying customer reviews prominently on your product pages. When potential customers see that others have enjoyed the product, they’re more likely to trust the product’s quality and be motivated to share their own experiences.

    Incorporating user-generated content, such as photos or videos from customers using your products, can amplify this effect. These visuals serve as tangible proof of the product in real-world scenarios, which can be more persuasive than text alone.

    For instance, if you sell a piece of clothing, showing how it fits various body types can encourage others to review their own experience with the fit or style.

    7. Optimize for Mobile Users

    In the era where mobile shopping often surpasses desktop, optimizing your WooCommerce store for mobile users is imperative, particularly when it comes to collecting product reviews. The first step is ensuring that the review form is mobile-friendly.

    This means the form should be easily accessible with minimal scrolling, featuring large, tap-friendly buttons for submitting ratings and text input fields that are responsive to touch. Consider the user flow on a smaller screen.

    The review section should be prominent and intuitive. On product pages, place reviews near the top or directly below the product details, where they are immediately visible without needing to navigate through multiple menus or scroll excessively. Speed is another critical aspect of mobile optimization.

    Mobile users expect quick load times; hence, optimize images and utilize caching techniques to ensure that the review section loads swiftly. If your review plugin or theme isn’t optimized for performance, consider alternatives that prioritize speed without sacrificing functionality.

    8. Educate Customers

    educate others

    Educating your customers on the importance of leaving product reviews can significantly increase participation.

    Start by explaining why their feedback matters. On your WooCommerce store, you can include a brief message on product pages or in post-purchase communications, highlighting how reviews help other customers make informed decisions, improve product quality, and support the community of buyers.

    Use your platform to inform customers about how their reviews contribute to the store’s ecosystem. For instance, you might detail in an email how each review helps tailor future products or services to better meet customer needs, or how it aids in maintaining transparency and trust within your brand.

    This can be done through newsletters, blog posts, or even a dedicated FAQ section about reviews.

    9. Leverage Email Marketing

    Email marketing remains one of the most effective tools for increasing product reviews on WooCommerce, allowing you to directly communicate with customers at key moments in their shopping journey. Here’s how to leverage it effectively:

    • Post-Purchase Emails: Send an email shortly after a customer’s purchase, thanking them for their order and inviting them to leave a review. The timing should be strategic, usually a few days after the product is expected to arrive, ensuring the customer has had a chance to experience the product.
    • Reminder Emails: Not everyone will leave a review on the first request. Follow up with a gentle reminder email, perhaps a week or two later. Keep these reminders friendly and non-intrusive, acknowledging that the customer might have missed the first email or simply hadn’t had the time yet.
    • Segment Your Audience: Tailor your review requests based on customer segments. For example, frequent buyers might receive a different message than first-time buyers, or you could segment based on the products they’ve bought if you have a wide range of items with varying review counts.
    • Incentivize Through Email: Occasionally, offer a small incentive through email for leaving a review, like a discount on their next purchase or entry into a giveaway. Ensure that these incentives are clearly for honest reviews to maintain integrity.
    • Personalized Requests: Use the data you have on customers to personalize your emails. Mention the specific product they’ve purchased or reference their past interactions with your brand. Personalization can significantly increase the open and response rates of your emails.
    • Educational Content: Sometimes, customers don’t leave reviews because they’re unsure about what to say. Include tips or questions in your emails to guide them on what aspects of the product to comment on, making the review process less daunting.

    10. Monitor and Improve

    Monitoring and improving your review strategy on WooCommerce involves a continuous cycle of analysis, action, and refinement. Here’s how you can make this process effective:

    • Track Review Trends: Use analytics tools provided by WooCommerce or third-party review plugins to track the number of reviews, their ratings, and the sentiment within the text. Look for patterns in what customers commonly praise or criticize across products.
    • Feedback Analysis: Beyond the stars, delve into the text of reviews. Use sentiment analysis to understand the emotional tone behind reviews. Are there recurring themes in negative reviews that need addressing? Or positive aspects you can amplify in your marketing?
    • A/B Testing: Experiment with different review requests to see what works best. Test various email subject lines, timing, or the language used in review prompts. You might find that one approach garners significantly more reviews than another.
    • Customer Satisfaction Surveys: Sometimes, reviews don’t capture everything. Implement post-purchase surveys to gather broader feedback, which can inform both product development and review strategy.
    • Monitor Competitors: Keep an eye on how competitors handle reviews. What are they doing well? Can you adopt or improve upon their strategies? This is not about copying but about learning from the broader market.

    Frequently Asked Questions

    Now, let’s take a look at some of the frequently asked questions.

    How can I automate review requests?

    You could use email marketing to automate the review requests. You can also use dedicated plugins for this task.

    Is it okay to offer incentives for reviews?

    Yes, but ensure incentives are for honest reviews to maintain authenticity.

    Can negative reviews help my store?

    Yes, they provide transparency and can guide product improvement.

    How often should I follow up for reviews?

    Once immediately after delivery, then a reminder after a week if no response.

    Conclusion

    Increasing product reviews on WooCommerce is not just about boosting numbers; it’s about enhancing trust, improving your site’s SEO, and ultimately, driving sales while fostering a loyal customer base.

    By implementing strategies like automation, incentives, and engagement, you can transform the review process into a powerful tool for your eCommerce growth.

    Remember, every review adds value, not only to your products but to the shopping experience of every visitor to your store. Start encouraging reviews today and watch as your WooCommerce site thrives with the feedback of its users.

    Which method would you pick?

    Let us know in the comments.

    Check out this page if you want video content instead of written tutorials.

  • Pre-Footer – How to Use, Ideas, and Best Practices

    The website pre-footer is a great tool for keeping visitors engaged once they’ve reached the bottom of a page. It typically includes menu items that help users learn more about the company, its products, or services. Using a heatmap can provide valuable insights into which parts of your footer are most frequently interacted with.

    Did you know what makes a great pre-footer? How do you build one to ensure it’s optimized for SEO? You’re in the right place! In this post, we’ll explore the fundamentals of an effective pre-footer, design best practices, and provide ideas for creating a website pre-footer that stands out.

    A pre-footer is a section that appears just above the main footer of a webpage. The prefooter is named for its position just before the footer, typically located at the bottom left of each page within a subsite. 

    It is often used to highlight important content or calls-to-action, such as newsletter signups, promotional banners, contact information, or quick links. This area acts as a bridge between the main page content and the footer, offering an additional opportunity to engage users or provide essential information.

    WordPress makes it super easy to customize your footer—every site has some way to edit and design it. So, here are two simple ways you can tweak your footer to make it your own!

    The WordPress Theme Customizer, accessible from your dashboard, makes it easy to adjust your site’s appearance. You can edit the header, footer, titles, and other global settings effortlessly.

    This is one of the safest and most user-friendly ways to modify your WordPress pre-footer.

    First, navigate to Appearance > Editor.

    Select Patterns, then scroll down to locate the Footer section.

    Select Patterns, then scroll down to locate the Footer section.

    Then, choose the pre-footer you wish to edit.

    choose the pre-footer you wish to edit.

    Note: This guide uses the popular WordPress theme Brandy, which pairs seamlessly with the Brandy Starter Site and offers additional customization features

    If your site is using a classic WordPress theme, you can modify the pre-footer by adding content through Widgets. To confirm if your site uses a classic theme, check under the Appearance menu in your dashboard. If you see the Widgets option, follow these steps to edit your footer

    1. Log in to your WordPress dashboard.
    2. Navigate to Appearance > Widgets.
    3. Locate the Footer widget section. Depending on your theme, there may be multiple footer widget areas available.
    Adding Widgets in Your Pre-footer in WordPress

    1. Call-to-actions (CTAs)

    A call to action (CTA) is a button or link designed to prompt users to perform a specific task, like signing up for a newsletter, downloading an app, or booking a reservation. Placing CTAs in the footer can help drive conversions by encouraging users to take action before they exit the site.

    Examples of Pre-footer CTAs:

    • “Subscribe to our Newsletter” with an input box for email and a “Subscribe” button.
    • “Download Our App” with a link to app stores.
    • “Book a Reservation” or “Schedule a Consultation” leading to a booking form.
    • “Sign Up” or “Request for a quote” buttons
    Pre-footer of Health Digest
    Image Source: Health Digest

    Nothing speaks louder than the words of happy customers! Add a short, impactful testimonial or two in your pre-footer to build trust with new visitors. Highlight a quick quote from a glowing review or a success story to show that people genuinely value what you offer. It’s a friendly and reassuring way to close the deal.

    Pre-footer of PageFly
    Image Source: PageFly

    3. Sitemap

    If your business has a physical location, adding an embedded map is a great idea. It’s incredibly useful for local customers or anyone planning to visit. Include an interactive map (like Google Maps) with your address and, if possible, your operating hours. It’s a thoughtful and practical touch that makes it easier for visitors to find you.

    Pre-footer of Du Pain et des Idées
    Image Source: Du Pain et des Idées

    Won an award? Got featured in the press? Don’t keep it a secret! Use the pre-footer to showcase any achievements or recognitions you’re proud of. A small badge or mention of awards can elevate your credibility and show visitors that you’re trusted and well-respected in your field.

    Pre-footer of Zapier
    Image source: Zapier

    If you’ve worked with big-name clients or partnered with reputable brands, display their logos here! It’s a subtle but effective way to build trust with new visitors. Seeing familiar names or companies associated with your business reassures potential customers that you’re the real deal.

    Pre-footer of Brevo
    Image Source: Brevo
    Pre-footer of Anydesk
    Image Source: Anydesk

    6. Add Social Media Icons

    Social media is a valuable channel for leads to connect with you. By including social profile icons in your page footer, you not only follow best practices but also create an opportunity to grow your audience across platforms.

    It’s no surprise that 72% of websites include social media icons in their footer to reap these benefits.

    Pre-footer of Elegant Themes
    Image Source: Elegant Themes

    5 Best Practices for Pre-footers to Enhance Brand Identity

    While you want to include valuable elements, avoid overcrowding the pre-footer. A clean and organized layout ensures that each component shines and doesn’t overwhelm the user.

    By following these practices, you can transform your pre-footer into a strategic space that enhances your brand identity, engages visitors, and encourages meaningful interactions.

    2. Make it Simple

    Start by focusing on key elements like your main pages, contact details, and social media links. When you have many links, consider using vertical alignment to group related items, such as product categories or services, in an organized manner.

    If you include an image, make sure it’s simple, readable, and works well even at smaller sizes. Avoid cluttered visuals like complex graphs or data.

    Use the pre-footer to highlight essential details that reinforce your brand. This could include your tagline, mission statement, or a brief “about us” snippet. By focusing on what defines your brand, you remind visitors what you stand for before they leave the page.

    4. Use Strategic Call-to-Actions (CTAs)

    Encourage visitors to take the next step with targeted CTAs that reflect your brand’s personality. Whether it’s “Join Our Community,” “Shop Now,” or “Let’s Chat,” the language and design of your CTA should feel like a natural extension of your brand voice. Make sure the buttons are easy to spot and action-driven.

    5. Incorporate Trust-Building ElementsFine Print

    Include elements that showcase your credibility, such as testimonials, award badges, or partner logos. These build trust and signal to visitors that your brand is reliable and well-regarded. A quick quote or a small visual of an award can make all the difference.

    Wrap Up

    The pre-footer of your website is a key area where both users and search engine bots expect to find important information that may not be located elsewhere. If you want to leave a positive and lasting impression, it’s essential not to overlook the bottom of the page. 

    Even the simplest, most functional sections of an interface can significantly impact a user’s overall experience.

    To enhance user experience, be sure to check out our YouTube playlist for more tips on improving your website’s appearance and functionality!

  • 5 Best WordPress Accessibility Plugins You Should Try

    Are you looking for the best WordPress accessibility plugins? If you are, keep reading this article. Here, we will show you the top five options you should try!

    When your blog or WooCommerce store targets a worldwide audience, consider accessibility. Some people prefer a larger font size than usual, while others prefer smaller fonts.

    By default, WordPress doesn’t come with the built-in accessibility settings. Hence, it is best to use a dedicated plugin for the task. If you are looking for an ideal WordPress accessibility plugin, keep reading this article.

    Here, we will show you the best 5 WordPress accessibility plugins you should try!

    But before going further, let’s see why you should start using accessibility plugins on your website.

    Why You Should Use Accessibility Plugins on WordPress

    Accessibility plugins for WordPress are not just tools for compliance; they are essential for providing an inclusive user experience.

    Using these plugins ensures your website is accessible to everyone, including those with disabilities. This inclusivity can lead to a broader audience enjoying your content, increasing engagement and loyalty.

    Here are the main reasons to use accessibility plugins on your website:

    • Enhanced User Experience: This makes your website usable for everyone, including those with disabilities.
    • Legal Compliance: Helps meet accessibility laws like ADA or EAA, avoiding potential legal issues.
    • SEO Improvement: Better accessibility increases search engine rankings by improving user experience.
    • Increased Usability: Features like keyboard navigation and adjustable text sizes benefit all users.
    • Higher Conversion Rates: An accessible site can increase user engagement and sales.

    Now, you know why you should use WordPress accessibility plugins. In the next section, we will show you the top plugins you can use for this task.

    Best WordPress Accessibility Plugins to Try

    In a nutshell, the best WordPress accessibility plugins are:

    1. WP Accessibility
    2. One Click Accessibility
    3. Accessibility by UserWay
    4. WP Dark Mode
    5. WP Accessibility Helper (WAH)

    Below, we will explain what each plugin offers and which is best for your needs.

    Without any further ado, let’s get into the list.

    1. WP Accessibility

    WP Accessibility

    The WP Accessibility plugin is designed to address common accessibility issues within WordPress websites, making them more inclusive for users with disabilities.

    This plugin targets a broad spectrum of accessibility enhancements to improve user experience for individuals who rely on assistive technologies like screen readers or who have visual, motor, or cognitive impairments.

    One of WP Accessibility’s core functionalities is its ability to add skip links. These links allow keyboard users to bypass repetitive navigation blocks, thus enhancing navigation efficiency. The plugin also automatically adds ARIA (Accessible Rich Internet Applications) landmarks, improving the structure and navigability of your site for assistive technologies.

    Features

    • Adds skip links for easier navigation
    • Improves link visibility for keyboard users
    • Manages long descriptions for complex images
    • Automatically adds labels to form elements
    • Removes target=”_blank” from links

    2. One-Click Accessibility

    One Click Accessibility - wordpress accessibility plugins

    One-Click Accessibility is a WordPress plugin specifically designed to enhance the accessibility of websites, particularly those built using Pojo themes or frameworks.

    The plugin introduces a one-click accessibility toolbar that allows users to adjust their viewing experience. Key features include increasing or decreasing font size, switching to grayscale, high contrast, or negative contrast modes, and applying readable fonts or underlined links to accommodate users with visual impairments.

    One of the standout features of Pojo Accessibility is its ease of use. With minimal setup required, even those without deep technical knowledge can significantly improve their site’s accessibility.

    Features

    • Accessibility toolbar for adjustments
    • Skip links for quick content access
    • Enhanced keyboard navigation
    • Visible focus outlines
    • Contrast and color options

    3. Accessibility by UserWay

    Accessibility by UserWay - wordpress accessibility plugins

    This plugin’s unique selling point is its AI-driven accessibility approach. It automatically scans your site for accessibility issues and applies fixes in real-time, which means less manual work for developers or site managers.

    This automation allows for immediate improvements across extensive websites, ensuring that even complex sites can achieve a higher level of accessibility with minimal effort. UserWay offers different subscription levels, from a free basic plan to premium options with advanced features like detailed accessibility audits, legal support, and customization options.

    This scalability makes it appropriate for small blogs and large corporate sites. The plugin is also known for its responsive customer support, which guides users through the setup process and offers ongoing assistance.

    Features

    • AI-powered widget for accessibility
    • Enhances compliance with WCAG, ADA standards
    • Automatic remediation of accessibility issues
    • Smart color contrast adjustments
    • Keyboard-only navigation support
    • Screen reader compatibility

    4. WP Dark Mode

    WP Dark Mode

    WP Dark Mode is a highly acclaimed WordPress plugin designed to make implementing a dark mode feature on your website effortless.

    Focusing on user experience, this plugin automatically adapts your site’s appearance to either light or dark mode based on the user’s device settings or explicit choice. This enhances readability and reduces eye strain, especially in low-light conditions.

    With features like keyboard shortcuts to toggle dark mode and the ability to adjust image brightness, the plugin aims to improve site accessibility for all users. WP Dark Mode works with the most popular WordPress themes and page builders, such as Elementor, Divi, and Gutenberg, ensuring your site’s design remains intact while in dark mode.

    Features

    • Toggles dark mode for website display
    • Automatic dark mode based on system settings
    • Customizable dark mode styles
    • Preset color schemes for dark mode
    • Switch modes via button or shortcode

    5. WP Accessibility Helper (WAH)

    WP Accessibility Helper

    The WP Accessibility Helper (WAH) is a plugin for WordPress websites that resolves common accessibility issues, making your site more user-friendly for individuals with disabilities.

    A distinguishing feature of WAH is its real-time DOM (Document Object Model) analysis, which offers immediate feedback on accessibility issues as content is added or changed on your site. This feature allows ongoing, dynamic adjustments to maintain accessibility without constant manual oversight.

    The plugin also includes various customizable options, from accessibility profiles tailored for ADHD or cognitive disabilities to specific adjustments like increasing letter or word spacing. This customization extends to the plugin’s interface, allowing you to tweak the widget’s appearance to match your site’s design.

    Features

    • Accessibility toolbar with font size control
    • Color contrast adjustments for better visibility
    • DOM scanner for detecting accessibility issues
    • Adds or fixes alt text for images
    • Provides skip links for easier navigation

    Conclusion

    Plugins like WP Accessibility and Accessibility by UserWay offer automated solutions for various disabilities, from visual to motor impairments, providing both ease of use and deep customization options.

    One-Click Accessibility and WP Accessibility Helper stand out for their user-friendly interfaces and real-time adjustments, ensuring that accessibility is not a one-time fix but an ongoing commitment.

    Meanwhile, WP Dark Mode introduces a subtle yet impactful way to improve readability and comfort. This mode indirectly supports accessibility by catering to preferences and conditions that benefit from reduced light exposure.

    Which plugin are you going to use?

    Let us know in the comments.

    Check out this page if you want video content instead of written tutorials.

  • 5 WordPress Christmas Themes to Deck Out Your Holiday Website!

    Christmas is just around the corner, the air fills with festive cheer, and it’s time to transform your website into a digital winter wonderland! Whether you’re running any kind of business, it’s a prime opportunity to engage with customers and boost sales. 

    On WordPress, from whimsical designs adorned with snowflakes and Christmas trees to elegant layouts perfect for showcasing seasonal promotions, the options are endless. In this post, we’ve curated a list of the top 5 WordPress Christmas themes that will help you deck out your website with style and flair. 

    Now, get ready to choose the perfect theme to deck your website halls!

    Why Use a WordPress Christmas Theme?

    Embracing a Christmas WordPress theme is a powerful strategy for businesses looking to capitalize on the holiday season. There are numerous compelling reasons to adopt a Christmas WordPress theme that can elevate your brand and drive sales.

    • Engaging Visuals: Christmas themes often feature festive colors, holiday-themed imagery, and eye-catching animations that create a warm and inviting atmosphere.
    • Increased Brand Visibility: A Christmas-themed website aligns your brand with the holiday season, increasing its visibility during a time when people are actively searching for gifts, decorations, and festive experiences.
    • Optimized for Holiday Sales: Christmas themes often include features to highlight holiday products and promotions, making it easy for customers to find what they’re looking for. It also provides strategic placement of calls-to-action to drive more conversions and sales.
    • Enhanced User Experience: A well-designed Christmas theme offers a seamless user experience, guiding visitors through your website with ease.

    5 Best WordPress Christmas Themes

    Brandy Theme

    Brandy - WordPress Christmas theme

    Firstly, we’d love to mention the Brandy Theme, which was just recently released. The potential features of this theme will be overwhelming for WordPress users. Brandy Theme is a versatile WordPress theme designed to create stunning, professional websites with ease.

    Brandy Theme, coupled with its extensive library of starter sites, including festive Christmas templates, empowers businesses to create stunning, high-performance websites with minimal effort. This powerful combination offers a seamless solution for businesses looking to capitalize on the holiday season. These sites are fully customizable, allowing you to tailor them to your specific needs and branding.

    Key Features:

    • Provide pre-built Christmas designs.
    • Quickly set up your online store with Christmas style.
    • Easily import and customize the starter sites.
    • Tailor the designs to match your brand identity and specific holiday promotions.
    • Ensure optimal viewing experiences across all devices.
    • WooCommerce compatibility to sell products and services online.

    imEvent – Conference Meetup Christmas New Year Halloween Event WordPress Theme

    imEvent - WordPress Christmas Theme

    Next, we’d like to introduce the imEvent theme, which seems popular with WordPress users. This versatile theme is specifically crafted to elevate your events, whether they are conferences, meetups, Christmas celebrations, New Year parties, or Halloween festivities. 

    With its sleek design and robust features, the imEvent theme ensures a seamless and impressive user experience for users, whether they use it for business or personal projects. This theme offers a flexible framework to create engaging and informative event websites. Elevate your Christmas holiday with confidence!

    Key Features:

    • Comes with 15 amazing color options, layout options, light and dark theme options to customize fully.
    • Create custom landing pages and event pages without coding expertise.
    • Ensure optimal viewing on all devices.
    • Compatible with payment gateways, registration forms, and countdown timers.
    • Seamless WooCommerce integration.
    • Multilingual support.

    Snowflakes Theme

    Snowflakes Theme for Christmas

    Snowflakes Pro is a premium WordPress theme tailored for Christmas. As a child theme of Fotografie, it helps transform your website into a winter wonderland. Its elegant design and festive features make it the perfect choice for holiday seasons, winter-themed businesses, or anyone who simply loves the beauty of snow.

    With its snow animation, cozy color palettes, and built-in festive icons, it adds instant charm to your site, which can create a huge storm of traffic. Moreover, the theme is WooCommerce-ready, making it perfect for holiday sales.

    Key features:

    • Offer color schemes to tailor the theme to match your brand identity easily.
    • Provide a countdown timer for special holiday events or sales.
    • Fully responsive and SEO-friendly.
    • Ensures optimal viewing experience across all devices.
    • Display your creative work in a stylish and professional manner.
    • Cross-browser compatibility.

    Upohar – Christmas WooCommerce WordPress Theme

    Upohar – Christmas WooCommerce WordPress Theme

    The next WordPress Christmas theme on this list is Upohar, developed by HasTech. It will be the best option for your business this holiday season. With a vibrant red and white color scheme, Upohar is a beautifully crafted WooCommerce WordPress theme designed to capture the magic of Christmas.

    In addition, Upohar is a sophisticated WordPress theme tailored for e-commerce businesses, particularly those operating during the holiday season. It’s designed to create visually stunning and highly functional online stores that captivate customers and drive sales.

    Key Features:

    • Provide stunning Christmas designs which easy to customize.
    • Effortlessly sell your Christmas products with seamless integration of WooCommerce.
    • Ensure a seamless shopping experience across all devices.
    • Customizable Header and Footer.
    • Provides diverse product display options to showcase your merchandise effectively.
    • One-click demo import

    Jingle Bells – Event Making Holiday Party Website WordPress Theme

    Jingle Bells - WordPress Christmas Theme

    Last in this list, but also loved by many WordPress users, is Jingle Bells. As its name suggests, we immediately know its function. Jingle Bells is a festive and engaging WordPress theme designed specifically to promote holiday parties and events. Whether you’re organizing a corporate Christmas party, hosting a community New Year’s bash, or running a winter festival, Jingle Bells has everything you need to make your website shine.

    Jingle Bells allows you to fully customize your landing page, with great variety of blocks, the color scheme is typical Christmas colors. Jingle Bells is the perfect WordPress theme to create a memorable online presence and attract a large audience.

    Key Features:

    • Built with the powerful Elementor page builder.
    • Offers a user-friendly drag-and-drop interface.
    • The theme includes a variety of engaging elements.
    • Provide a visually appealing design with a holiday-themed color scheme and animated elements.
    • Fully responsive to ensure a seamless user experience across all devices.
    • Improve your website’s visibility on search engines.

    How to Optimize Your Website for Holiday Traffic

    Holiday is the best time to spread the cheer on your website! With many people searching for festive deals, gift ideas, and holiday inspiration, ensuring your site is fully prepared can make all the difference.

    Start by selecting the right Christmas WordPress theme, you should consider some essential factors like your purpose to build WordPress website, look for themes that allow easy edits to match your branding, ensure it works well on all devices, and check if it supports essential plugins like WooCommerce or page builders.

    Next, you should focus on festive content such as blog posts, holiday gift guides, or promotions to attract visitors and keep them engaged. Additionally, consider enhancing your site’s SEO by including relevant holiday keywords throughout your content. 

    An important note, shoppers are often impatient, and a slow website can lead to lost sales. Therefore, you should focus on your website’s loading speed. Compress images, minimize CSS and JavaScript files, and utilize a reliable caching plugin to ensure your pages load quickly. 

    Last but not least, integrate social media sharing buttons to make it easy for your visitors to share your holiday promotions and content with their networks. By effectively optimizing your website for holiday traffic, you’ll not only enhance the visitor experience but also maximize your chances of conversions during this bustling season.

    Final Thoughts on Festive Design with WordPress Christmas Theme

    As you can see, when the holiday season approaches, the importance of creating a warm and inviting online presence cannot be overstated. The right WordPress Christmas theme can transform your website into a festive haven, capturing the spirit of the season and enticing visitors to explore what you have to offer. Whether promoting a holiday event, selling festive merchandise, or simply sharing seasonal greetings, our themed highlights allow you to express your unique holiday style.

    In conclusion, taking the time to choose an ideal festive design can lead to a memorable browsing experience that promotes engagement and fosters holiday cheer. Be sure to keep your content updated, incorporate seasonal elements, and use design features to convey special promotions, holiday greetings, or heartfelt stories. Embrace the magic of the season, and let your website shine as brightly as the twinkling lights on a Christmas tree!

  • Best Hair Salon Reservation Themes for WordPress

    Running a hair salon means having a website that works as smoothly as your services. And when it comes to managing appointments, nothing beats a reliable reservation system. 

    Lucky for you, WordPress offers some fantastic themes that not only showcase your salon’s style but also integrate booking system plugins. Whether you’re looking for something sleek, modern, or full of customization options, we’ve rounded up the best hair salon reservation themes for WordPress that will keep your clients booking and coming back for more.

    We’ve handpicked the best-selling hairdressing WordPress themes to give you plenty of options. Now, let’s dive into their features and see what they can do!

    Salox – Hair Salon WordPress Theme

    Salox - hair salon reservation WordPress theme

    If you’re searching for a hair salon reservation WordPress theme that truly captures the vibe of a cozy, stylish hair salon, the Salox theme might be your perfect match. It’s designed to impress clients from the very first glance, with a layout that feels both chic and inviting. This theme is ideal for hairstylists, barbershops, beauty lounges, spas, and salons offering services like hair care, makeup, and body treatments.

    This theme is fully compatible with WooCommerce, so you can easily sell an unlimited range of products online. It features 3 unique homepage designs for a personalized look, a variety of service list layouts to showcase your offerings stylishly, and 3 top menu styles that align perfectly with your brand’s identity.

    Features:

    • Visual composer included
    • Revolution slider included
    • Amazing parallax
    • Drag & drop page builder
    • Unlimited colors and skins
    • 600+ Google fonts is ready to use
    • RTL Support

    Pricing: $39

    Coiffeur – Hair Salon WordPress Theme

    Coiffeur - Hair Salon Reservation for WordPress Theme

    Coiffeur is a premium hair salon reservation WordPress theme, perfect for hair salons, beauty salons, and hairdressers. It includes everything you need for a standout salon website, with featured sliders and elegantly designed homepage layouts, all easily managed through an intuitive options panel.

    Built with HTML5 and CSS3, this theme leverages the latest web technologies to deliver advanced styling and functionality. It follows proper heading tags and coding standards, ensuring excellent search engine optimization (SEO) to help your salon website rank well. Coiffeur is highly customizable, offering 6 homepage designs, over 20 page templates, and 300 custom icons tailored for hair and beauty businesses.

    Features:

    • Buil-in Ajax Theme Options Panel
    • Clean & Commented code
    • Customizable Background: Color, Image, Video, Parallax 
    • RGBA Color Picker with transparency function
    • Includes FullScreen Video Background (YouTube, Vimeo and Self Hosted) Video Function

    Pricing: $59

    Luxcut – Hair Salons and Hairdressers WordPress Theme

    Luxcut - Hair Salons Reservation and Hairdressers WordPress Theme

    Elevate your online presence with the Luxcut theme, a beautiful and feature-packed platform designed specifically for hair salons and hairdressers. 

    Luxcut combines a stunning design, intuitive features, and limitless customization options, allowing salon owners, hairdressers, and beauty professionals to create a digital presence that truly reflects the elegance and creativity of their work. Unleash your creativity with customizable layouts, display your lookbook in stunning galleries, and effortlessly manage salon reservations with the built-in online booking form.

    Features:

    • 4 Pre-Designed homepage layouts 
    • 800+ Free Google fonts
    • Multiple header layouts 
    • 20+ Pre-build pages for quick start
    • Compatible with SEO plugins
    • Optimized for Contact form 7

    Pricing: $49

    PaulHair – Hair Salon and Hairdresser Theme

    PaulHair - Hair Salon Reservation and Hairdresser Theme

    The PaulHair WordPress theme for hair salons and stylists seamlessly integrates with online reservation plugins, providing beautiful showcases of your work through stunning galleries, video support, a built-in blog, and Instagram integration.

    Features:

    • Optional separate logo for light and dark header versions 
    • Custom Post Formats: Audio, Video, Standard, Gallery, Link, Quote 
    • Compatible with the Booked – Appointment Booking for WordPress plugin 
    • Portfolio Gallery layout 
    • Customizable Footer Top with 1-4 Columns layouts 
    • Highly customizable typography settings 
    • 1000+ Google Fonts

    Pricing: $79

    Curly – A Stylish Theme for Hairdressers and Hair Salons

    Curly - A Stylish Theme for Hairdressers and Hair Salons

    With its contemporary design, regular updates, and polished style, it’s clear why Curly has become a bestseller on Envato—a must-try hair salon reservation theme for anyone in the hairdressing business.

    Designed specifically for hair salons and hairdressers, this stylish theme offers a vast collection of layouts, including options for beauty salons and skincare services. It’s fully compatible with the Elementor Page Builder, Qi Blocks for Gutenberg, and more.

    Features:

    • Custom Post Formats for Standard, Gallery, Link, Quote, Video, and Audio blog posts 
    • WPML Plugin compatible 
    • Customizable Footer Layout – up to 4 columns 
    • Gallery Portfolio Single layouts 
    • Masonry Portfolio Single layouts 
    • Large collection of useful inner pages

    Pricing: $79

    Ayesha – Hair and Beauty Salons WordPress Theme

    Ayesha - Hair and Beauty Salons Reservation WordPress Theme

    Ayesha is a modern and elegant hair salon reservation WordPress theme crafted specifically for hair salons, beauty salons, beauty artists, nail salons, and similar businesses.

    One major advantage of Ayesha is its collection of exclusive, customizable WPBakery Page Builder shortcodes, giving you complete control over your website’s design and functionality.

    Features:

    • Custom WPBakery Page Builder Shortcodes
    • 4 Homepage Layouts
    • Gallery Post Type
    • Parallax Effects Backgrounds
    • Custom Typography Options
    • Bootstrap Grid System
    • 100% Responsive Design Layout

    Pricing: $39

    Lirena – Elementor Spa & Beauty Center WordPress Theme

    Lirena - Elementor Spa & Beauty Center WordPress Theme

    Lirena is a visually stunning, feature-packed hair salon reservation WordPress theme tailored for the beauty and spa industry. It offers 3 striking homepage layouts, complete with Ken Burns sliders and a variety of header styles. The theme also includes pre-designed project layouts, multiple inner pages to showcase your business, and a host of other powerful features.

    Built entirely on the Elementor front-end drag-and-drop page builder, this theme makes editing and customization easy and accessible, even for those without programming experience.

    Features:

    • GDPR Compliant 
    • Manage Brand Colors Easily 
    • GT3 Header Builder 
    • SEO Friendly 
    • Human Friendly Demo Data Import 
    • Cross Browser and Cross Platform

    Pricing: $59

    Conclusion

    To sum up, Curly and Paul are your top choices with their outstanding features and design in hair salon reservation themes. However, if you’re on a budget, Ayesha is a great alternative to consider. 

    For those who need advanced booking system functionality, Bookster is the way to go. It integrates seamlessly with any of these themes, allowing you to add appointment scheduling, manage online availability, handle payments, and easily oversee client management, making it a complete solution for your hair salon’s booking needs.

    You can consider balancing the cost between the theme and the plugin. If your main goal is to optimize the online reservation system, we recommend choosing an affordable theme and investing more in the booking plugin. This is because the booking functionality of themes can’t compare to a specialized appointment plugin, which offers more advanced features and better control over your reservation system.

  • Best 7 WordPress Photo Gallery Plugins You Should Try

    Are you looking for the best WordPress photo gallery plugins? If you are, keep reading this article! Here are the best seven plugins you should try.

    Images are a vital part of every website, and WordPress photo gallery plugins make it simple to showcase them beautifully.

    A well-crafted image gallery can elevate your content, whether presenting a photography portfolio, showcasing product images for an online store, or enhancing blog posts with visuals.

    However, with countless options, finding the perfect plugin that combines features, aesthetics, and user-friendliness can be overwhelming.

    In this listicle, we’ve compiled a list of the top WordPress photo gallery plugins, highlighting their standout features to show you the gallery styles each one can create.

    Let’s jump in and find the ideal image gallery plugin for your WordPress site!

    Here are several reasons why you should consider using WordPress photo gallery plugins for your website:

    • Enhanced Visual Appeal: WordPress photo gallery plugins allow you to display images in various attractive formats, such as slideshows, grid views, masonry layouts, and lightbox popups. This enhances the aesthetic value of your site, making it more engaging for visitors.
    • Improved User Experience: These plugins often include features like image navigation, lightboxes for full-screen viewing, and hover effects, which enhance users’ interactions with your images. This can lead to increased user engagement and time spent on your site.
    • SEO Benefits: Some plugins have SEO-friendly features that help optimize your images for search engines. These features include the ability to add alt tags, titles, and descriptions to images, which can improve your site’s visibility in image search results.
    • Ease of Use: Many WordPress gallery plugins offer intuitive interfaces with drag-and-drop functionality, making it easy for anyone, regardless of technical skill, to create and manage galleries. This user-friendliness is crucial for quick content updates without needing deep technical knowledge.
    • Customization and Flexibility: You can customize the look of your galleries to match your site’s design or theme without extensive coding knowledge. Options include adjusting layouts, spacing, captions, and even image transition effects.

    Now you know why you should consider using the photo gallery plugins. The next section will show you the top seven plugins you should try.

    In a nutshell, the best seven plugins are:

    • NextGen Gallery
    • Enira Gallery
    • FooGallery
    • Soliloquy Slider
    • Modula
    • Photo Gallery by 10web
    • Photo Gallery by Supsystic

    Below, we will explain each plugin’s offerings. Without any further ado, let’s get into the list.

    NextGen Gallery - WordPress Photo Gallery Plugins

    NextGEN Gallery is one of the most widely used WordPress photo gallery plugins, with over 32 million downloads.

    Developed by Imagely, photography industry experts, it offers a solid free version featuring two main gallery styles (slideshow and thumbnail) and two album styles (compact and extended).

    One of the key attractions of NextGEN Gallery is its versatility. It offers various gallery types, so there isn’t just one “typical” style.

    In addition to offering various gallery types, the premium versions add advanced features such as eCommerce functionality for selling images, image protection options like hotlink protection and watermarks, and image deep linking for enhanced lightbox galleries.

    Features

    • Organize multiple galleries into albums for streamlined sorting and viewing.
    • Group and manage images with easy tag updates.
    • Sell individual images or entire galleries with integrated payment processing.
    • Enable automatic image rotation within galleries.
    • Access over 84 theme options for gallery presentation.
    • Protect images with customizable watermarks.

    Pricing: Free. The premium starts at $29.

    Active installations: 500,000+

    Rating: 4.5/5.0 (on WordPress.org)

    Envira Gallery

    Envira Gallery is a well-regarded freemium plugin with both free and premium versions. Many users find the free core plugin sufficient to create stunning galleries, but the premium version unlocks additional advanced features.

    This plugin allows you to create versatile gallery styles, including grid, masonry, justified, carousel, and slideshow layouts. You can display either standalone galleries or albums that combine multiple galleries.

    Features

    • Easily build galleries with drag-and-drop functionality.
    • Organize galleries with cover photos.
    • Share galleries on Facebook, Twitter, and Pinterest.
    • Add YouTube, Vimeo, and Wistia videos.
    • SEO-friendly linking to individual images.
    • Sell images directly through WooCommerce.

    Pricing: Free. The premium starts at $79.

    Active installations: 100,000+

    Rating: 4.5/5.0 (on WordPress.org)

    FooGallery - WordPress Photo Gallery Plugins

    FooGallery is a user-friendly WordPress image gallery plugin celebrated for its simplicity and ease of use.

    It offers a variety of customizable templates, enabling you to tailor the layout and appearance of your galleries to fit your website’s design. You can also fine-tune details like thumbnail size, borders, loading icons, hover effects, and more to achieve the perfect look.

    Features

    • Built-in lightbox with customizable colors, transitions, thumb strip, fullscreen mode, and auto progress control; override captions shown in a lightbox.
    • Enjoy awesome hover effects with adjustable colors, scaling, and icons.
    • Features like lazy loading, optimized code, and reduced content layout shift for better performance
    • ALT and title attributes on all images; integrates with Yoast SEO, Rank Math, and AIOSEO sitemaps.
    • Utilize the built-in media library for image management and drag-and-drop reordering.
    • Apply custom styles for both galleries and albums.

    Pricing: Free. The premium starts at $33.99.

    Active installations: 100,000+

    Rating: 5.0/5.0 (on WordPress.org)

    4. Soliloquy Slider

    Soliloquy Slider - WordPress Photo Gallery Plugins

    Soliloquy Slider is the most powerful and user-friendly slider plugin for WordPress. It is optimized for web and server performance, recognizing speed’s critical role in SEO and conversions. 

    Independent speed tests consistently show that Soliloquy is the fastest plugin on the market. Its versatility sets Soliloquy apart; you can create dynamic sliders from photos, featured blog posts, Instagram images, testimonials, and more.

    Features

    • Seamless integration with the Gutenberg editor for easy content creation.
    • Intuitive builder for effortless layout customization.
    • Create slideshows using blog posts, pages, products, testimonials, and other custom post types.
    • Design stunning product slides for your WooCommerce store.
    • Personalize designs with custom CSS styles.

    Pricing: Free. The premium starts at $39.

    Active installations: 40,000+

    Rating: 4.5/5.0 (on WordPress.org)

    5. Modula

    Modula Image Gallery

    Modula is the ultimate WordPress gallery plugin for creating custom, unique, and responsive galleries on your website. Modula allows you to effortlessly add stunning, fast-loading galleries in both free and premium versions.

    With its custom grid functionality, you can easily resize images within your gallery’s container, adjusting heights, widths, and aspect ratios to your liking.

    Simply switch a gallery from ‘creative gallery’ to ‘custom grid’ and start modifying image dimensions by clicking and dragging from the bottom right corners of your photos.

    Features

    • Easily link your Instagram account to import images directly into your Modula Gallery, enriching your website with Instagram content.
    • Display images in a slider format with customizable elements like thumbnail strips, dots, arrows, and various effects.
    • Protect your photos by adding custom watermarks.
    • Optimize images by reducing file sizes and serving them from a CDN for faster website performance at lower costs.
    • Group multiple galleries into albums for easy access, perfect for documenting events like holidays.

    Pricing: Free. The premium starts at $39.

    Active installations: 100,000+

    Rating: 4.5/5.0 (on WordPress.org)

    Photo Gallery by 10Web

    The Photo Gallery by 10Web plugin is one of the most downloaded WordPress gallery plugins. It offers free and premium versions.

    One standout feature of this plugin is its ability to integrate videos; users can create galleries that include embedded videos and mix and match images and videos within the same gallery.

    This flexibility enables a dynamic media presentation, making it easy to showcase various types of content on your website.

    Features

    • Images and photos capture attention, leading to higher engagement and boosted pageviews.
    • Relevant tags and metadata for images improve search visibility in Google results.
    • High-resolution photos in attractive layouts are key to a well-designed, effective website.
    • Flexibility in design and customization allows complete control over gallery style, optimization, and display.

    Pricing: Free. The premium starts at $30.

    Active installations: 200,000+

    Rating: 4.5/5.0 (on WordPress.org)

    Photo Gallery by Supsystic

    Photo Gallery by Supsystic is a free WordPress plugin with a compelling free version and additional advanced features in its premium plans.

    With versatile tools and customization options in the Pro version, Photo Gallery by Supsystic caters to diverse needs. It allows users to create visually engaging galleries that enhance their website’s user experience.

    Features

    • Adjust shadows, borders, captions, and icons to create unique gallery styles.
    • Choose shadow presets, customize color/thickness, and add descriptions and icons to each image.
    • Add titles and descriptions to improve gallery visibility on search engines.
    • Galleries are optimized for mobile-friendly viewing.
    • Enhance loading with options to display more images gradually.
    • Improve load times with CDN support, image compression, and optimization.

    Pricing: Free. The premium starts at $49.

    Active installations: 30,000+

    Rating: 4.5/5.0 (on WordPress.org)

    Frequently Asked Questions

    Now, let’s look at some of the frequently asked questions.

    Are free gallery plugins sufficient for most users?

    Free versions are often enough for basic galleries. However, premium versions usually unlock advanced features like custom layouts, SEO enhancements, watermarking, and priority support.

    Can I integrate videos in a WordPress photo gallery?

    Many plugins, like Envira or Photo Gallery by 10Web, support video integration. This allows you to create multimedia galleries by mixing images and videos.

    How can I protect my images with WordPress gallery plugins?

    Many plugins offer watermarking options, protecting images from unauthorized use by overlaying a logo or watermark onto each photo.

    Can I use these plugins with page builders like Elementor?

    Yes, most popular gallery plugins are compatible with page builders like Elementor, SeedProd, Divi, and Beaver Builder, allowing you to create, edit, and sync galleries directly within your page builder environment.

    What features should I look for in a WordPress gallery plugin?

    Look for customization options (styles, borders, captions), SEO-friendly settings, mobile responsiveness, and features like lazy loading, watermarking, and social media integration. Some plugins also offer eCommerce support and video gallery options.

    Conclusion

    Like most WordPress plugins, there’s no one-size-fits-all solution for photo galleries. If you need a quick, intuitive setup, FooGallery stands out for its user-friendly interface, with NextGEN and Envira Gallery following closely behind.

    Most of these plugins offer free versions, so you can explore them firsthand and find the templates and features that best suit your style.

    Which plugin would you try?

    And if you prefer video content over written articles, be sure to check out our YouTube channel!

  • What is WooCommerce All About (25+ FAQs Answered)

    Do you need more information on what is WooCommerce? If you’re looking to know more about WooCommerce and its features, keep reading this article!

    You have an eCommerce store, want to convert your brick-and-mortar store to an online store, or are just learning to start an online business. This article has you covered!

    This blog will discuss a powerful and versatile platform that empowers entrepreneurs to build and manage online stores, WooCommerce. 

    According to statistics, this platform runs 39% of the eCommerce market websites. This is quite an impressive number for us to entrust our online business, starting with WooCommerce.

    However, understanding WooCommerce is impossible. That’s why we’ve compiled this comprehensive guide, which answers over 100 frequently asked questions about WooCommerce. 

    We’re excited to share the questions we’ve gathered from our engaging WooCommerce user communities! This article is designed to provide you with everything you need to know about WooCommerce and to help you tackle those challenging problems you might face.

    Let’s review our extensive FAQ list and equip ourselves with the knowledge to succeed in online retail!

    What is WooCommerce?

    Getting started with WooCommerce is an exciting venture for anyone looking to launch an online store within the WordPress website, and understanding the basics can set you up for success.

    WooCommerce is a popular open-source eCommerce plugin for WordPress. It’s free to use, customize, and modify according to specific needs.

    By using WooCommerce, you can:

    • Product Management: WooCommerce allows store owners to add unlimited products to their websites, including physical goods, digital downloads, and subscriptions. It provides an easy-to-use interface for adding product details, pricing, images, and variants.
    • Payment Integration: This feature allows store owners to accept multiple payment gateways, such as PayPal, Stripe, credit cards, bank transfers, and more.
    • Shipping Options: This option provides flexible shipping settings, such as flat rates, free shipping, local delivery, and real-time shipping calculations.
    • Fully Compatible: It integrates seamlessly with WordPress themes and plugins, allowing you to manage and customize your store’s design without knowing how to code.
    • Analytics and Reporting: Offers built-in analytics for sales, customers, and store performance.

    With some patience and creativity, you’ll be well on your way to crafting a successful eCommerce business using WooCommerce.

    Whether selling handmade crafts, digital downloads, or retail products, this platform is tailored to help you thrive in the online marketplace.

    Manage WooCommerce in the WordPress Dashboard

    We all know WooCommerce is a WordPress plugin, so we should look closer at the WordPress admin dashboard to set up a WooCommerce store before starting.

    Install and activate WooCommerce. It is the core of any plugin for running your online store and has some cool features.

    WooCommerce plugin installed - What is WooCommerce

    Navigate to the WooCommerce section. Follow the instructions to configure your online store, such as integrating with the theme, adding products, providing general information about your store, setting payment methods, and so on.

    WooCommerce settings - What is WooCommerce

    With WooCommerce, you can easily monitor your order history, customer data, stock levels, and revenue—all in one handy report analysis table!

    WooCommerce reports

    Frequently Asked Questions All about WooCommerce

    As mentioned, we’ve compiled this question list from some WooCommerce communities. Let’s see what they’re concerned about when developing their WooCommerce store.

    Are you planning to start multiple eCommerce stores on WooCommerce WordPress?

    I am confused about choosing a lightweight, easy-to-manage, responsive, and Elementor-supported WooCommerce theme.

    The answer comes from a professional with extensive experience designing websites. They have worked on many clients’ projects and achieved certain successes.

    They have suggested themes like Woodmart, Porto, XStore, Flat, Martfury, etc.

    Wanna find a plugin allowing users to input specific details at the checkout stage?

    Using ‘Product Addons’ allows you to add boxes such as dietary requirements, ages, etc., but these do not appear on the product page.

    Is there a way for the categories and tags to not show on the product page?

    Just add some CSS to hide it.

    How can I add a checkout form on a single product page?

    Use Jotform or Fluent Forms plugins.

    Does anyone know how I can add the location, date, duration, and price to my WooCommerce product and then show it in a table like this website?

    To achieve this, you can add custom fields using the Advanced Custom Fields (ACF) plugin or a combination of the Product Add-Ons Ultimate plugin and the Product Table Ultimate plugin.

    The former can set the custom fields of location, date, and so on, while the latter lists them in a table format. 

    Find a plugin to present products by weight and manage inventory.

    You can manage inventory for WooCommerce product variations by setting stock quantities individually for each weight option.

    You might also consider using plugins for more advanced inventory control, such as WP Inventory Manager, Bulk Variations Manager, and Stock Sync for WooCommerce. 

    How do you hide taxes on the cart page for non-logged-in users?

    The ELEX WooCommerce Catalog Mode, Wholesale & Role Based Pricing plugin makes it easy to manage how taxes are displayed.

    While WooCommerce’s standard tax options allow you to hide taxes from the shop or cart page completely, they don’t let you select specific user roles for this feature.

    Thankfully, this plugin allows you to exclude tax based on the WooCommerce user roles, making it even easier to tailor your customers’ experience.

    Find a plugin that allows us to customize the “mailto” on an order page (adding a subject and some custom text). Or do we have to edit the PHP file of the order template to do so?

    Using YayMail – WooCommerce Email Customizer, which offers a list of email templates to customize the appearance of email marketing, including logo, color, text, images, buttons, etc.

    Is there a plugin that lets me set up a login system for my website? I would need to prevent access to my booking appointment website plugin until I manually approve the registration

    WPBookster is a fantastic plugin that empowers store owners to effortlessly set up their booking appointment systems and login forms in real time, complete with a handy booking calendar!

    Whenever customers make a new appointment, store owners can approve it manually.

    Plus, it sends friendly auto-reminders to staff and customers when appointments are approaching, ensuring everyone stays on time!

    What is best to show an “on-sale” on the home page?

    Create a category called on sale, add products, and then loop through that category.

    I’m looking for a plugin or functionally-based solution to customize a product’s label on the image, such as “sale, new, exclusive clearance, or whatever.” Do you have any ideas?

    To create product labels, you can refer to some plugins such as WooCommerce Product Labels, Advanced Product Labels, and YITH WooCommerce Badge Management. 

    A lot of the products we sell can be ordered in different sizes. However, when a size is not in stock, it must be especially for that customer. In the back office of WooCommerce, there is no setting for that kind of product. It is only possible to allow or not allow backorders, and that is not the same. The problem is that Google wants a date for the product to be in stock again, but that is not possible when the product is only made when there is an order. Is there a way to add this function, such as using a plugin?

    Check out the “WooCommerce Lead Time by Barn2” plugin.

    Is there a way to create a new page in Elementor or another page builder and add only the product thumbnails from one product category on this page? Is there a WooCommerce shortcode for this?

    You can create a page with product thumbnails from a specific category using Elementor or WooCommerce shortcodes.

    Use the [products] shortcode with the category slug, like `[products category=”your-category-slug”], or Elementor’s WooCommerce widgets, and filter by category.

    No custom coding or plugins are needed!

    I want to add videos to my default WooCommerce product gallery without using a plugin

    Yes, adding videos to the default WooCommerce product gallery is possible without a plugin. You can add a custom function to your theme’s functions.php file.

    Can I email my WooCommerce customers using WP Mail SMTP?

    You can connect it to a service or CRM like MailChimp and create a marketing email campaign with YayMail to trigger that email on registration. 

    How to stop bots from signing up as WooCommerce customers but not having a captcha on the checkout page?

    My go-to for all Anti-Spam is CleanTalk. It’s only $12 a year, works seamlessly with WooCommerce, and bots hate it.

    OOPSpam supports WooCommerce. It doesn’t load any JS or cookies like reCaptcha and clean talk. It’s pretty effective against both manual and automated bots. OOPSpam is more expensive than other alternatives, though.

    In WooCommerce Subscription, do we need the whole address for people to make payments?

    No, that is handled by the payment gateway. However, you need a valid address for the invoice (and order) to be valid.

    Can anyone recommend a Payment Gateway for a small business that allows us to offer monthly payments for products but guarantees these payments in case the buyer chooses not to continue paying?

    No merchant would allow that, as all the customer would do is force a chargeback and say they canceled. It’s all legal.

    Be careful if it’s for adult content or something similar, as most merchant processors, such as PayPal/Stripe, don’t allow it.

    What are some ways to prevent chargebacks and liability?

    Ensure you have clear contracts outlining services and payment terms, use secure payment systems with fraud protection, document all communications and transactions, offer excellent customer support and maintain regular backups of your sites.

    How can an affiliate program (having a coupon code method) be integrated into the product website?

    Check out these plugins: SliceWP and AffiliateWP. 

    Customers don’t receive emails after completing an order

    Installed an SMTP plugin, such as YaySMTP—a powerful tool that allows users to connect with many popular sending services. It has an unlimited email log, and users can track opened and clicked emails.

    How can I increase the size of my file upload in Media to 5 MB or more?

    You can use a plugin or cPanel.

    How do you push product data from Google Sheets to WooCommerce to create new products?

    Try Sure Triggers. It is an excellent plugin for integrating various plugins, services, etc.

    Are there any plugins that allow you to ship a product in multiple boxes that are also free or at least minimally priced?

    WooCommerce supports shipping a single order by multiple packages.

    There are different ways to break an order into these packages, but it usually works by shipping class.

    You can customize the logic that splits an order into packages with small plugins or a small amount of PHP. It just depends on how you want to break up the order.

    How do you turn off the WooCommerce store for the month?

    If you want to keep SEO value but just stop the checkout process, switch off all the payment gateways. Then, enable the built-in WooCommerce store notification option in the Customiser.

    To temporarily close the WooCommerce store, you can use a plugin like “Maintenance” or “Coming Soon Page & Maintenance Mode” to set up a landing page while keeping the store offline.

    These plugins allow you to display visitors a custom message or landing page while keeping the store inaccessible.

    This way, you can manage your products and website without affecting your store’s visibility. Make sure to test the plugin to ensure it works as expected.

    Install a “Coming Soon” or “Maintenance Mode” plugin (like SeedProd or WP Maintenance Mode)

    Set the entire store to “Private” or “Draft” mode in WooCommerce settings.

    Alternatively, use the “WooCommerce Store Closed” plugin to temporarily disable purchasing.

    For 3000+ products, use bulk edit to set all products to “Draft” status. To disable purchasing temporarily.

    How do you display language switcher flags on a landing page without a menu and header?

    Consider using the Polylang plugin to display the language switcher flags.

    What is the best WordPress theme for a business website?

    I highly recommend the Brandy theme—a creative theme for building your business website. It provides professional pre-design templates and dynamic content sections, which allow you to build your WooCommerce website in any niche.

    What is the best FREE coupon plugin for WooCommerce with better options?

    I highly recommend “Smart Coupons For WooCommerce Coupons.” It is not 100% free, but the free function allows an automatic coupon once the condition is met. Many other plugins require a pro or premium version to use this.

    How do you show out-of-stock items on the first shop page without clicking on them?

    There are two ways of making your ‘Out of Stock’ badges more eye-catching or aligned with your website’s overall look: by installing a suitable WordPress plugin such as FooGallery PRO Commerce for Out of Stock Badges, Sold Out Badge, etc., or by using custom code.

    How do I set up payment gateways in WooCommerce?

    Setting up payment gateways in WooCommerce is a breeze. After activating WooCommerce, you can access the payment settings from the WooCommerce settings menu.

    Here, you’ll find options for various payment methods, including credit/debit cards, PayPal, Stripe, and more. Select the gateways you wish to enable, fill out any required fields, and save the changes to start accepting payments.

    Conclusion

    We’ve compiled some frequently asked questions from real WordPress users to help you understand WooCommerce and how it fits into your WordPress website.

    WooCommerce is a fantastic tool many WordPress users use to transform their regular websites into vibrant eCommerce stores. You need its features to build an amazing online shop, so why not take full advantage of it?

    Check out the questions we’ve gathered! They’ll give you insight into some of WooCommerce’s many exciting features.

    If you have any questions or need help with anything related to WooCommerce, please don’t hesitate to contact us. We’re here to support you; together, we can create successful online businesses!

  • How to Build a Multilingual Store with WooCommerce 

    How to Build a Multilingual Store with WooCommerce 

    A multilingual website can help businesses reach new markets and audiences from linguistic backgrounds. By providing content in multiple languages, companies can improve their ranking on Google for localized searches, driving more organic traffic from different regions. When users can browse and read in their native language, they tend to stay longer, reducing bounce rates and increasing engagement. This personalized experience fosters trust, making visitors more comfortable interacting with the site and boosting conversions.

    After all, people don’t buy what they can’t read. A study revealed that 42% of online consumers never make a purchase in a language other than their native one. A multilingual site makes your brand accessible to non-English speaking customers, helping you capture their attention and showcase your products in their native language. 

    Most businesses aim to outshine competitors by focusing on product differentiation. That’s true, but creating a multilingual WordPress site can also feel overwhelming. Without coding skills, it can seem costly and timely and can’t be done in just a day. With all those compatibility issues and conflicts from the themes and plugins you’re using—how do you make everything work?

    Does WordPress Support Multiple Languages?

    WordPress doesn’t let you use two languages or support multilingualism by default. The default language for WordPress is English, which works well if most of your traffic comes from the U.S., Canada, Australia, or the U.K. 

    However, you can easily add multilingual functionality with the help of plugins. These plugins allow you to create, manage, and display content in multiple languages, making your website more accessible and user-friendly for a global audience.

    multilingual speaking
    Image Source: iStock

    What Are the Benefits of Creating a Multilingual WooCommerce Store?

    • Improved Site Traffic

    A multilingual store can attract a wider audience by catering to users who speak different languages. By translating your content, product descriptions, and metadata, your site becomes more accessible to non-English-speaking customers. This can lead to higher search engine rankings in various languages, resulting in increased organic traffic from international markets. Additionally, as users share your content in their native languages, you can further expand your reach, driving even more traffic to your site.

    • Increase Sales

    When customers can shop in their native language, they are more likely to understand product details, promotions, and policies, which can significantly influence their purchasing decisions. A seamless, localized shopping experience reduces barriers to entry and increases the likelihood of conversions. By providing a multilingual site, you not only accommodate diverse customers but also tap into new markets, ultimately leading to higher sales and revenue.

    • Competitive Advantage

    In an increasingly globalized market, having a multilingual WooCommerce store gives you a competitive edge. Many businesses still operate in only one language, so offering multiple languages can set you apart from your competitors. This differentiation can attract customers who prefer shopping from stores that understand their culture and language, making them more likely to choose your brand over others. By addressing the needs of diverse consumers, you position your business as a more inclusive and customer-oriented option.

    • Better Brand Trust

    Building trust with your audience is crucial for long-term success. A multilingual site demonstrates that you value your customers’ language preferences and cultural backgrounds. When users find your site in their native language, they feel more comfortable and confident in their purchasing decisions. Clear communication and localized content foster a sense of familiarity and trust, making customers more likely to return to your store for future purchases. This enhanced brand loyalty can lead to repeat business and positive word-of-mouth referrals.

    How to Build a Multilingual Store with WooCommerce 

    1. Install Required Plugins

    First, you need to install the plugins that will assist you in building a multilingual store. 

    You can find these plugins in the WordPress repository or directly from your admin dashboard by navigating to Plugins > Add New and searching for the names of the plugins you want to install. For paid plugins, you’ll need to visit the plugin’s official website to make a purchase.

    Let’s begin with the first thing that comes to mind when considering a multilingual store: a store that supports flexible language switching. This means allowing users to easily switch between different languages on your site, ensuring a seamless experience regardless of where they’re from.

    For translation plugins, you can refer to the following options:

    multilingual store with translation plugin

    Your selected translation plugin should be compatible with the latest versions of WordPress and WooCommerce, as well as with any essential plugins and themes utilized on your website.

    When choosing a translation plugin, consider factors like ease of use, the number of supported languages, and whether you prefer manual or automatic translations. Each of these options has its strengths, so select the one that best fits your website’s needs.

    For multi-currency switchers, consider these plugins:

    multilingual store with multi-currencies switcher plugin

    Not only do translation plugins feature flags for each country but if you’re also seeking a multi-currency switcher that displays flags, consider using YayCurrency. It includes advanced features like processing checkout in local currencies, tracking order history in the currency selected by the customer, and allowing you to view WooCommerce reports by currency, along with many other functionalities.

    2. Decide the Languages for Your Visitors

    multilingual languages
    Image Source: Freepik

    Deciding on suitable languages to add to your store is an exciting step toward reaching a broader audience. To start, take a look at your target market and get to know the demographics of your existing customers. By analyzing your website traffic, you can identify regions that show significant interest in your products or services. This will help you prioritize which languages to focus on first.

    Moreover, it’s also worth considering the languages spoken by your competitors. This insight can reveal market demand and highlight opportunities you might want to explore. Offering translations in multiple languages not only enhances the user experience but also builds trust with international customers, making it much easier for them to navigate your site and complete their purchases.

    Once you’ve figured out which languages you want to add, the next step is to select a translation plugin that supports those languages and fits your specific needs. With a bit of planning, you’ll create a welcoming environment for shoppers from around the globe!

    3. Unlock Your Store’s Multilingual Potential With TransPress and YayCurrency

    WPML can be an excellent choice for those looking to upgrade their store to a multilingual platform, as it offers support for both multilingual and multicurrency features. However, it’s important to note that WPML is a paid plugin. For those seeking ways to leverage their store for free, here are some alternatives.

    In this part, I’ll show you how to transform your existing WooCommerce store into a multilingual one using the user-friendly WordPress translation plugin, TranslatePress, along with a multicurrency switcher plugin called YayCurrency.

    Ready to break your limits? Imagine unlocking more opportunities, leading to increased sales and more customers discovering your business.

    Let’s get started!

    From your WordPress dashboard, go to Plugins and click on Add New. Search for “TranslatePress” in the search bar, then click Install and Activate to enable the plugin.

    Download TranslatePress plugin

    Next, navigate to SettingsTranslatePress to set up the basic configurations. In the General settings, you can select your default language and choose the additional languages for translating your content. I’ve added French as an example.

    Choose languages in TranslatePress Settings

    You’ll see the language, code, and slug associated with each entry. The slug is responsible for loading the appropriate language version based on user preferences.

    For example:

    • mystore.com/en/product/cherry-beanie/ – English version
    • mystore.com/fr/product/cherry-beanie/ – French version

    Note that the French URL isn’t translated into French; this is just to illustrate the structural concept. And TranslatePress can also handle this for you, naturally making it a good idea to translate your URLs as well.

    For instance, your cart page might have the following slug in English:

    • mystore.com/cart

    In French, it would appear like this:

    • mystore.com/panier

    In addition, TranslatePress includes a floating language switcher button on the front end of your site by default, enabling visitors to switch between the languages you’ve configured.

    Customize language switcher in TranslatePress

    You can customize the switcher’s appearance with options for displaying full or abbreviated language names, flags, or a combination of both.

    Once you’ve completed the basic configurations, you can begin translating your WordPress content.

    Load your page, then in the top menu bar, click on Translate Page and select Settings.

    Translate Page

    To translate text or modify an existing translation, hover over the text you wish to translate and click the blue pencil icon, or use the drop-down menu on the left to search for content on the page.

    The text you want to translate will appear in the sidebar. Adding a translation is simple—just enter your text and save your changes.

    Choose elements to translate

    As shown below, “cart” has been translated into French as “panier.”

    the results after translating

    Applying the same way of doing things, continue clicking to select specific elements, enter your translations, and move on to the next piece of text.

    After saving your changes, a switch button will appear, enabling you to toggle between the translated languages. If you prefer a more flexible option or want to position the button prominently, you can use the shortcode [language-switcher] to place it anywhere on your site.

    the shortcode of language switcher

    If you want to sell in multiple currencies, you’ll need an extension that can dynamically convert your default currency, allowing prices to be displayed in your shopper’s local currency.

    So that you know about the theory behind running a multilingual WordPress site, let’s dig into the actual how-to and show you how you can get up and running with YayCurrency.

    YayCurrency - WooCommerce Multi-Currency Switcher

    After installing and activating YayCurrency, go ahead to set up the currencies you want to support in your store.

    Add new currency in YayCurrency

    Once the setup is complete, the switcher will automatically appear on each product page.

    You can easily add the YayCurrency switcher widget to your preferred widget area by using the shortcode: [yaycurrency-switcher]. By placing the switcher in a prominent location, such as the header, footer, or sidebar, you allow customers to see product prices in their preferred currency easily.

    The shortcode of YayCurrency switcher

    This plugin allows you to manage various display options. Users can customize the display by choosing which elements to show or hide, including the country flag, currency name, currency symbol, and currency code. 

    Display option of YayCurrency

    Let customers see product prices in different currencies!

    Show currency switcher in product page

    By placing the switcher in a prominent location, such as the header, footer, or sidebar, you allow customers to easily see product prices in their preferred currency.

    Show currency switcher in header

    Your multilingual store is now fully established, so it’s ready to serve customers in multiple languages and multi-currencies!

    multilingual store is now fully established

    4. Optimize Your Site for Multilingual SEO

    Now that you’ve set up your multilingual store, it’s time to optimize it for multilingual SEO to ensure customers can find you no matter what language they’re searching in. Here are some tips to help you enhance your site’s visibility across different languages:

    Use SEO-Friendly URLs

    Make sure your URLs reflect the language of the content. You can do this by using subdirectories (e.g., https://example.com/en/) or subdomains (e.g., https://en.example.com) for each language version. This helps search engines understand and index your pages correctly.

    Implement Hreflang Tags

    Hreflang tags tell search engines which language and region a particular page is intended for. By adding these tags, you prevent duplicate content issues and ensure that users see the correct language version in search results.

    Translate Meta Tags

    Remember to translate your meta titles and descriptions. These elements are crucial for SEO and can significantly impact click-through rates. A compelling meta description in the user’s native language can make all the difference.

    Use Geo-Targeting

    Geo-targeting involves identifying a user’s location, typically based on their IP address, and then serving them relevant content, such as the correct language, currency, or product recommendations for their region. 

    Leverage Multilingual XML Sitemaps

    Large websites with multiple languages can be difficult for search engine bots to crawl effectively. Leveraging multilingual XML sitemaps is a powerful SEO strategy that helps search engines efficiently crawl and index the different language versions of your website. 

    Search engines like Google use XML sitemaps to discover and prioritize which pages to index. By creating separate sitemaps for each language, you can ensure that all language versions of your site are properly indexed, increasing their visibility in local search results.

    Let’s start building a multilingual WooCommerce site today!

    By offering your store in multiple languages, you cater to visitors who prefer to browse and make purchases in their native tongue, helping to build trust and eliminate barriers to conversion. Implementing language detection, localized content, currency adjustments, and native language support ensures that users feel comfortable navigating and purchasing from your site, ultimately leading to higher customer satisfaction and increased sales. 

    If you’re unsure where to begin creating a multilingual WooCommerce store, YayCurrency, a freemium and easy-to-use currency plugin that works out of the box with WooCommerce, can be a great first step. 

    Start today and offer your visitors a seamless, multilingual shopping experience that meets their needs, no matter where they are in the world!